Countdown

Showing posts with label DIY. Show all posts

Friday, August 12, 2011

Invitations are d-o-n-e done!

Used on the inner RSVP SASE.

PHEW!! Happy that is over...everything has been addressed, stamped, mailed off! The whole invitation process was a real pain in the butt! We have a total of 138 guests invited (more if kids are counted)...somehow more than we anticipated.

A side not for DIY couples that are on a tight budget...

If you are trying to save on the cost of stamps, do not add ANYTHING to your invitation that alters the "shape" of the envelope. Let me give you a for instance...if you purchase a invitation "kit" where everything is included and all that is needed is to print the invitations and RSVP cards on your home printer...do not add any rhinestones to the invites to make it more festive or even a simple ribbon around the invitation. Unless of course you are ready to pay more for your stamps.

We were very careful not to add anything "unnecessary" to the invitations - maps, accommodations, etc - that could be easily sent out via email at a later date. This was to keep the weight of the invites down. We had no idea that the hours of hand gluing rhinestones on to the invites would render them "unmachinable" thus jacking the stamp from 44 cents to 64 cents. OH WELL! I won't lie...Michelle and I stood in the line at the post office and contemplated pulling off all the rhinestones...but we instantly got over it.

Here is a peak at the stamp we selected...

Used on the outer envelope


Thursday, July 28, 2011

The Guest Book

Michelle and I have been looking for alternative guest book ideas. We have played with several possibilities, including covering a plain guest book with fall leaves. Though it was nice, we were not impressed and felt that it did not fit our personalities. At the end of the day, we have come to the realization that the guest book as we all know it is old, tired, and boring. We asked ourselves how often will we actually drag out the guest book and flip through it? Once? Twice? Never.

Stock Photo - with a little addition :P

Michelle found a pretty cool spin on the guest book that does fit our "fall themed" wedding perfectly. It is the Wedding Tree! The concept is simple; there is a tree printed on canvas, ink pads of various "fall" colors, and a pen. Allow me to explain further...

Stock Photo

Stock Photo
Guests will find a large canvas with a tree painted on it where the traditional guest book would usually be found. Next to the "tree" the guests will find various colors of ink pads that they can choose from. Then they can ink up their thumb (or any finger) and press it on to the tree. Finally they can pick up the pen and sign their name under their "leaf". Like I said...simple concept.

Stock Photo


Stock Photo

We did find an awesome website that will allow you (for a limited time) request a pdf template be sent to you customized for your wedding - totally free! So we did...and this is what they sent us...


We plan on sending this PDF to Kinkos to print for us, then we will affix it to the canvas. Once we get this done we will be posting to show how it turned out. I will also post a link to the website where you can get your own custom PDF file created in the resource tab (if I ever get that put together). 

What you think of the Tree Guest Book? We would love to hear your feedback...

Wednesday, July 27, 2011

DIY Boutonniere Trial #1


This is our trial mock up of the groomsman's boutonnieres. Neither Michelle nor I are florists by any means; but we are happy with the outcome thus far. We may try and change somethings but we think this will be the basic idea of the final product.

There will be a DIY instructions following. We did not take pictures along the way while making this mock up. We had no idea that we would actually like it. Just a heads up, the calla lilly is fake (real touch). The total cost of making the one we have estimated at $1.85! We will give a better breakdown of materials and cost in the DIY instruction post.

Once we get the hang of making the boutonnieres, we will move on to a bigger floral project: the brial party bouquets.

SO....what do you think? Any comments and/or suggestions are always welcome!!
Posted by Picasa

Sunday, July 24, 2011

My Dream Wedding Shoes!


My dream wedding shoes are Grace Glitter Platform Sandals by Stuart Weitzman... only a mere $ 355.00! Just out of reach! LOL


After reading a bunch of posts all talking about their do it yourself project...Glittering their wedding shoes! Perfect solution, I was headed to buy a pair of heels, then to Michaels to get all the supplies needed: glitter, fabric glue and mod podge.
These shoes were the inspiration for my next DIY project! A woman on the Weddingbee.com glittered her shoes pink and they looked great! I thought well I can do that, so off I went!


First stop was JcPenney to purchase my heels, I had a $15.00 off coupon and every penny counts! While waiting for a salesgirl to help me, I started looking at the clearance rack and what did I see...Gold Glitter Heels!


J Ferrar Gold Glitz Heel...My wedding shoes!

Needless to say my DIY project went out the window and I purchased these J Ferrar Slingbacks! They were originally $70.00: clearanced for 27.99 plus we must subtract my $15.00 coupon and my shoes cost a whopping 19.99 with tax!!! I think that I will do a little diy on the shoes, I want to put I and DO on the bottoms with Gold Stones! I can not wait to wear them!


Friday, July 22, 2011

Semi-DIY Wedding Invitations

All I can say is WOW!!

Michelle was on Ebay looking for wedding invitation kits when she came across 2 listings for Laura Ashley Wedding Invitation Kits. There are 50 invitations and response cards in each kit. Originally retailing between $150-$200 (from what we could tell from the current Laura Ashley line); Michelle won both listings! Our cost? $0.99 and $5.24 plus shipping for a grand total of $16.00.

Great job Michelle!!!

Stock photo

With the help of fellow DIY Wedding couple, Tara and Philip, we also have the perfect template to print on the invitations. Please check out Tara's blog. She has a lot of great ideas and instructions!

Get your own template here for FREE! (GREAT FIND TARA!!)


Thursday, July 21, 2011

Enter Speed Bump #1

As promised, our DIY wedding adventure would not be without speed bumps and pot holes. Enter speed bump #1!


If you are doing your own wedding...make sure if you go with an unconventional location for the reception (ie VFW Hall, Park District building, ect)...make sure they have linen for the tables. It may not seem like a big deal, until your look into the cost of buying or renting 15-20 120" round and 5-10 90x156" rectangle tablecloths! These babies range in price from $12.99 to 30+ a piece! If this is something that you have not planned on, it will be a HUGE blow to your already small DIY wedding budget.

We turned to our good friends...Ebay and Craigslist. Craigslist was dead on arrival! However, we found several really good auctions going for tablecloth lots on Ebay. (Remember to always double check shipping costs before bidding as tablecloths are heavy and will cost you 80+ more dollars!) We were very fortunate when Michelle stumbled on a really awesome buy it now/make offer listing. It was for local pick up only in near by Arlington Heights. The listing was for 22 black 120" round tablecloths for a buy it now price of $150. Even though black was not Michelle's first choice, we took a gamble and made an offer of $100. Rejected. We countered with $130. Time expired on the offer. We decided to come in with one more offer of $135. If rejected, we would just buy the listing for the $150. Well, 2 hours after submitting the offer, someone swooped in and bought the lot from under us.

Moral of the story: If the listing is really good and you know it...just buy the damn thing! But I digress...

We have combed over countless listings. It is very frustrating. Michelle did find a pretty nice website called Weddingbee. It is there that Michelle may have found our saving grace....keeping our fingers crossed! Hopefully in the coming weeks we will put this speed bump in our rear view mirror and move forward with out major traffic jams!

Wednesday, July 20, 2011

Wedding Favor Brainstorm

Michelle and I have been throwing around several ideas for wedding favors. We know that we want something meaningful and something that our guests will actually use after the wedding.


  1. Candy wrapped in tulle
  2. Personalized mint tin
  3. Candles
  4. Picture frames
  5. Candy in boxes
We have thought, researched, priced, and thought some more...here is the shortlist:

1. Michelle's Oatmeal Cookies in a Mason Jar
(stock photo)
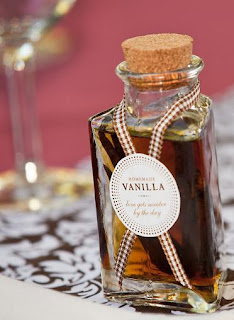
2. Homemade Vanilla Extract
(Idea and photo stolen from Tara's getting married Blog)

3. Hot Chocolate Kits
(stock photo)

What are your thoughts on the "shortlist"? We are not sure what we will be doing yet but we are open to ideas and suggestions!


Tuesday, July 19, 2011

DIY Pew Bow

Here is what you will need. A detailed supply list will be included at the end of this post.

Wired edge ribbon is very forgiving and hold the shape you set it in.

Wired edge ribbon has two sides. Satin side (left) and raw side (right). 

Pull some ribbon of the spool (18-24 in) and pinch with your thumb.

Create your first loop. I use about 10" of ribbon to create one loop.
  
Twist the ribbon over and pinch. The twist is very important to keep the satin side out for the next loop.

Almost there! Right now we have 6 loops. You can stop here or continue for a fuller bow.

Here we have 10 loops (5 on each side of the pinch). The bow is a mess right now, but that's okay. 

Tie off your "pinch" with a satin ribbon. You can also use floral wire if you like.  Rest your thumb...it will be sore.

Let out some ribbon for the second tail to match the length of the first one. Fluff your bow.

Cut a long piece of your organza ribbon. I used my arm to measure - shoulder to finger.
Center in your hands and make 2 loops.

Now cross the ribbons like you are tying a shoe.

Imagine a shoe lace...

Pull the loops and adjust the tails.
Here is your basic bow! Can you see the finish line?
Cut a piece of floral wire - about 6" should do.


CAREFULLY thread the wire through the knot of the bow on the backside of your bow.

Bend and twist the wire around your satin bow to attach.

I like to fashion the wire in to a hook to pull double duty.

Fluff it up and adjust as needed.

One down....19 to go....

This is honestly a very easy DIY project. If you can find the ribbon on sale...even better! We got the ribbon 50% off at Hobby Lobby. The satin ribbon cost $4 on sale. Organza was $2 on sale.

This is what you will need to make this bow:
  • Wired 2.5" satin ribbon (color pictured is ivory)
  • 7/8" organza ribbon (color pictured is rust)
  • 7/8" satin ribbon - use the same color as your wired ribbon (optional)
  • Floral wire (we used 18 gauge which is pretty thick - pulling double duty as a hook.)
  • SHARP scissors 
A 30 foot spool will yield 2 bows of the "5 loop" variety (the one we made above). You could possibly get 3 bows out of the spool if you make the "3 loop" variety. The estimated cost of each bow (at the above cost for materials) is about $2.50 per bow. This is a HUGE savings compared to retail cost of a finished bow!

Let us know what you think or if you have any questions, comments or suggestions! Good Luck!